Friday, October 29, 2004

Progress report

My visitors have gone now, so it's time to knuckle down again. I did manage to get the arts-business assignment finished and printed last night so I can hand that in today. I still need to re-do my image-making 2 folder and finish my visual diary and hand that back in, but I'm aiming for next friday to do that.

Goals for next Friday (5/11/04)
  • Ideas and image making folder complete - hand in on Friday
  • visual diary finished - hand in on Friday
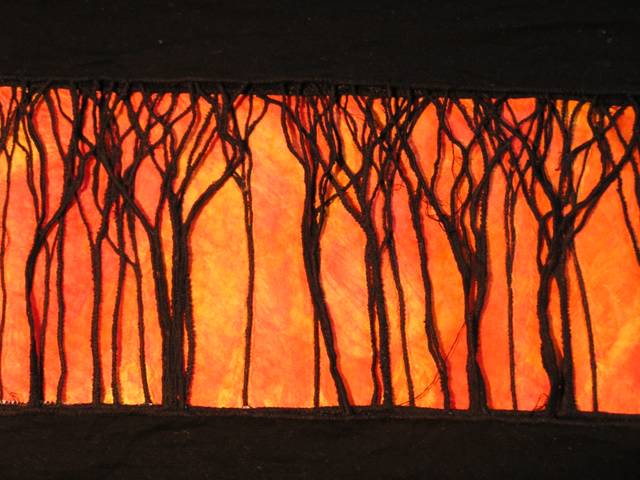
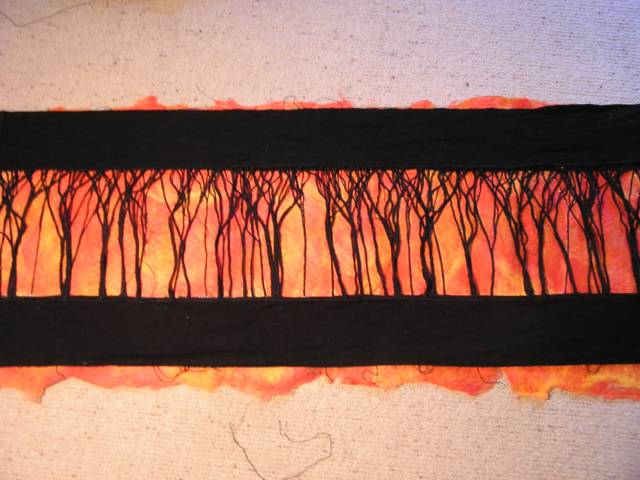
  • Silhouetted trees #2 completed and ready to go to the framer
  • mount and finish off wrapped figures - for photography on Wednesday
  • finish footsteps and hang - for Wed photos
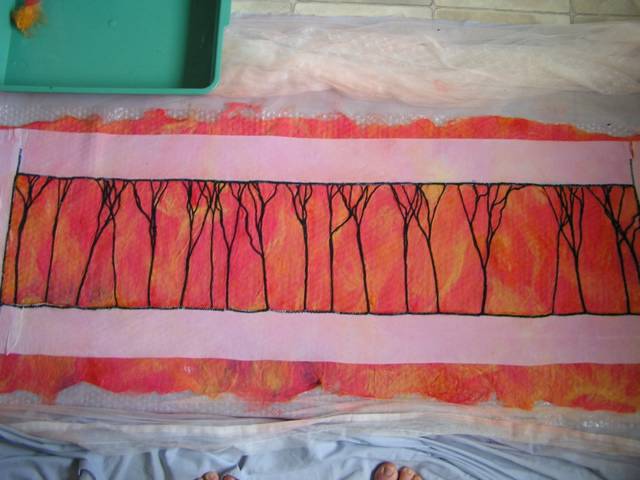
  • get strip #2 well underway - strip made, place images and start stitching them
  • put together folder of exhibition peices, showing development and progress (for assessment on Friday) - good thing I have this journal so I just need to go through and find the relevant entries.

Looks like I've got a busy week ahead of me - but there's no choice, the exhibition is on in less than 4 weeks.

It does help that Tuesday is Cup day and I get the day off (and B is working so I can get down to work without feeling guilty)

Wish me luck... I'll need it.

Wednesday, October 27, 2004

This weeks goals

This weeks goals have just flown out the window.  When I wrote this I'd forgotton that I had a friend staying over on Wednesday night, and that I was taking here and her daughter to the airport on Thursday.  Anyway, plans changed slightly and I went out to pick them up last night so nothing achieved Tuesday night, nothing will get done tonight, and tomorrow will be taken up going to the airport and the tax man (provided we can get an appointment).  So Saturday will see me a very busy girl!!

I did however manage to get the spare room clean - which was a good think 'cause that's where K and K are staying.
This weeks goals:

    • Piece together fabrics for strip #2
    • Draw/cut-out/layout leaf patterns for strip #2
    • Solve stitching/dissolving problems for trees #2
    • Make spare room livable and workable
    • Get MOST of stitching of trees #2 completed (enough so that it can be finished by the end of the weekend)

Monday

    • Make spare room livable and workable

Tuesday

    • Draw/cut-out leaf patterns for strip #2
    • Solve stitching/dissolving problems for trees #2

Wednesday

    • Piece together fabrics for strip #2
    • layout leaf patterns for strip #2

Thursday

    • Stitching of trees #2

Friday

    • Work on footprints

Tuesday, October 26, 2004

The threads and fabrics that I've dyed for strip #2 - all ready to go...
Still looks messy but a far sight better than before!!!
Mission accomplished!!!

Monday, October 25, 2004

Weekend Progress Report

My biggest task last weekend was to get the framing arrangements for my silhouetted trees project sorted, so that I could comfortably move onto the other similar project, knowing that I will be bale to get it framed as I had planned (in layers, with gaps between).


After visiting one framing place where the guy who was there too k one look at it and said that he'd have to get the boss to have a look at it - would I mind leaving it there till he got back in 2 weeks time, and finding the second place closed, I went to a place in Richmond where you can either do it yourself, or let them do it for you.  The lady there was extremely helpful and seemed confident that it could be done, and would be keen to do the other piece as well.  Her rough quote - somewhere between $300 and $400.  I'd kinda expected the $300 as it is both fidly and large so it wasn't really all that surprising.  Also if she does the second piece, she's said that it should be a bit cheaper most of the problems will already have been solved. 


So now I'm ready to get started on the second silhouetted trees piece.  I've checked on the measurements of standard matboard sheets this time (the other one needs over-sized stuff, that's dearer and needs to be ordered in) so that should keep the costs down a bit


I did a small sample for trees #2 on the weekend and have decided that I need to give it some more thought.  My idea was to do this in green and use a zig-zag stitch to create a leafy effect.  Problem is, when you do zig-zag on soluble fabric, that's loose and leafy, it doesn't stay zig-zag when you dissolve it!!!!  So the idea now is the use either a sheer fabric and heat it (to get the wholes) or snippets of sheers, or tulle/netting, or be more careful to overlap my lines of zig-zag in more of a grid form so that it's all connected = more samples!!!


I also now have al my fabrics and threads dyed for strip piece #2 - no framing here thank goodness!!  Now it's just a matter of laying them out and piecing them together.


Other than that there's not a lot of other progress to report.  I spent Sunday cleaning the house (again my work had taken over 2 rooms (in addition to the spare room which is now referred to as my sewing room) and getting it back to normal.  I still need to get in and clean the spare room, so that I can actually work in it, and also so that my parents have somewhere to stay when they get here.  Might give that a go tonight and then get down to work on Tuesday evening.


This weeks goals:


  • Piece together fabrics for strip #2
  • Draw/cut-out/layout leaf patterns for strip #2
  • Solve stitching/dissolving problems for trees #2
  • Make spare room livable and workable
  • Get MOST of stitching of trees #2 completed (enough so that it can be finished by the end of the weekend)


Monday

  • Make spare room livable and workable


Tuesday

  • Draw/cut-out leaf patterns for strip #2
  • Solve stitching/dissolving problems for trees #2


Wednesday

  • Piece together fabrics for strip #2
  • layout leaf patterns for strip #2


Thursday

  • Stitching of trees #2


Friday

  • Work on footprints


Saturday, October 23, 2004

Nearly finished!! (i know I promised this some time ago, but you know how it is..)

Thursday, October 21, 2004


A close up! - Will send some more when it's framed. I'm off to do that today. Posted by Hello

Silhouetted trees #1 layed out and ready for framing - I am so proud of myself Posted by Hello

Wednesday, October 20, 2004

Penelope Illustration

Checked out this Penelope Illustration blog today. She's starting up what she calls, Illustration Friday. A theme is set each Monday, and you have til Friday to post your illustration to your blog and email penny. Perhaps this is a way to get moving on the journalling.

This weeks topic is "Fiesta" - I'm gonna give this a go (and of course there are deadlines which are little nudge to get me moving)

I did it!!!!!

I actually met my goal this weekend - well... almost...  I said that I'd have my silhouetted trees piece finished by Thursday evening.  I didn't quite manage that, but I did have it done by Saturday evening!!

That's 2 down, a third nearly done and 2 to go!! The end is in sight!!

After talking to my Tutor on Friday, I have made a few decisions about the remining pieces. 

  • One will be another silhouetted trees piece, this time in greens and browns and with foliage as well (I've got some sampling to do there); and
  • The other will be in the same vein as the footsteps piece, in as much as I'll be dyeing fabrics and peicing them together in a similar way.  This time the image will be leave (I think) and the timeline will be that of a fire burning through bush - from old growth, to burning, to burnt, to regrowth, to old growth again.

If I get time I may even do another piece to replace the figures, as I've got some ideas for a third silhouette.

So... seeing that my goal setting was effective last week, here are this weeks goals - lets see how we go....

  • Monday evening  - do dye samples

                        - Wash fabric ready for dyeing on Tuesday
                        - dissolve soluble vylene from trees and lay out to dry

  • Tuesday evening         - wash and dry dye samples and decide on colours

                        - Dye fabric for next strip piece

  • Wednesday evening       - wash and dry dyed fabrics

                        - draw up image for strip (leaves) and do sample layout
                        - draw images onto freezer paper for laying out

  • Thursday        - Take silhouetted trees (1) to framer for framing

                - Get soluble vylene from MacPhersons
                - get threads for silhouetted trees (2) from spotlight
                - get threads for leaves strip
                - Piece strip together
                - layout images
                - sample stitching for silhouetted trees (2)

I think I may be a bit toooo ambitious here, but I do need to get them done ASAP!!  Only a week and a half till the photographer comes, so I NEED TO DO THIS!!!

Friday, October 15, 2004


A close up. This is the silk paper with the stitched trees layed over the top (and attached with the glue from the silk paper) Posted by Hello

Progress pics of my silhoutted trees - still wet Posted by Hello

Tuesday, October 12, 2004

Silhoutted trees

Now onto the third layer of trees.  I still need to go back and re-stitch the second layer but the basic shape is there.  Tonight I'm heading over to a friends place to dye some silk for the silk paper background.

I was talking to her last night and talked myself back into the silk paper idea. It is striking and if I lay the fibres right then I'll get a flamey look.  She's also suggested that when I layer the most distant layer of trees on the background that I should use whisps of silk over some of the branches to hold them down.  This would give a flame effect in the distance.

Another idea that we discussed, which I had thought of previously but had forgotten, is to add some wrapped wire branches to the foreground layer and bend them out of the picture.  This then leads to the next question - do I put glass in the frame or not.  Glass makes it more (as my mother would say) "dustable" but would affect the wire.  If I did have glass in the frame I'd need to add another layer of mattboard and block it up a bit to give it a bit more depth.  Another thing to play with.

If all goes well and I do nothing but projects on Thursday I should get this one finished this week.  Not framed of course but I will need to get it off to a framer ASAP so that it will be done in time.  I'll also have to start saving for that one - I can see it costing a small fortune (no glass would make it cheaper!).

Monday, October 11, 2004

Exhibition piece #4

True to form I have moved onto the next piece without completing the previous one.  However this time I've skipped right over #3 and dived straight into #4.

#4 is a piece that I've worked in my head so many times it feels as though I've done it before.  In a way I have.  It's an image that I used on the cover of one of my folders one term, but I am developing it further.

Basically the image is silhouted trees one a red/yellow/orange background.  There will be three layers of trees stitched onto soluble vylene, each of a different thickness (thick, thin and in between) to show distance.  The three layers will be mounted over each other with a gap between and placed onto a feiry coloured ground.  I've finished the stitching on one layer and am half-way through the second.  I still have some decisions to make about the ground yet too.  I originally thought a silk paper ground would be effective, but I've been toying the idea of silk painting a backround to add another dimension...  We'll see...

Tuesday, October 05, 2004

Exhibition piece #3...

Now that the end is in sight my second piece, my mind now starts to wander into thoughts of my next. My interest in dolls seems to be re-igniting, especially with my discovery of art dolls and the inspiration that I've been getting from art doll quaterly and the yahoo group wildartdolls. Anyway, enough waffle, my idea is this... a life size (or near life-size) self portrait doll??? I'm not sure why, I'm not sure how, but the idea intrigues me. I think that the shock value of such a large piece could be interesting.

I think that the idea started when I was at the Geelong Fibre Forum open day. There was a lady at the bazaar - wish I knew her name as her work was absolutely amazing - who did cloth dolls that were painted with gesso. Some of them (I only saw pics) were so lifelike!!

Anyway, on the way home, my head was a-buzz with thoughts on how I could use this technique. I haven't done any drawings or designing yet, but I'm imagingin a life-size, life-like figure (modelled on me), sitting hunched in a protective pose, naked, but with sections peeling back to reveal the inner self - perhaps images of past, future, people in my life etc...

If the figure were painted with gesso, it would have added strength and structure, and allow some interesting painted effects. The peeled back sections could be the colour and the spark - the creativity - and the skin and the shape/pose could be the life-like aspect that I relish.

Another thought that I've had.... And I'm not sure if it's part of this idea or a new one... is to reflect the people that have helped me throughout life - the supports that have assisted my rise in brilliance!

The end is in sight!!

I've been working madly on the footsteps project lately.  Every minute that I can spare is spent at the machine or hand sewing.  Of the 13 feet (prints that is) I have 2 untouched and one part-finished (handsewing this one).  I've washed out the dissolvable fabric that I used as a pattern, and have just this morning before work, heated and melted the chiffon scarf. 

It is now stretched out on the lounge room floor again (the only space large enough in our small flat to accommodate it) and the contemplation begins.  It seems that I have matched my colours a little too well and the stitching is blending too well into the background.  But all is not lost yet.  I intended to add some red/orange stitching in the upper part of the piece - signifying the fact that I am coming out of my shell and not afraid to stand out - but I might also add some of that to the middle and some lighter blue threads to highlight sections.

The cut back feet do show up as the cut back layers are at different directions and their colours stand out, however they do need something to bring them all alive.

I also still have to work with the foot that I stuffed up earlier.  After unpicking the heel section, I gave up and cut back the upper section, but still have small bits of paper around the stitching lines, which is slowing being removed with a pin, a pair of tweezers and a lot of patience. 

Perhaps I'll iron it again and hold it against a wall and see what I think. A photo might also help at this stage to see it as others will - I'll post one when I do this.